扩展 Microsoft.Owin.Security
微软在 OWIN 框架中对 OAuth 认证的支持非常好, 使用现有的 OWIN 中间件可以做到:
- 使用 Microsoft.Owin.Security.OAuth 搭建自己的 OAuth2 服务端, 没做过的可以参考这个简单教程: 使用 OWIN 搭建 OAuth2 服务器 ;
- 使用 Microsoft.Owin.Security.Facebook 连接 Facbook 认证, 让用户使用 Facebook 帐户来登录;
- 使用 Microsoft.Owin.Security.Google 连接 Google 认证, 让用户使用 Google 帐户登录;
- 使用 Microsoft.Owin.Security.MicrosoftAccount 连接 Microsoft 认证, 让用户使用 Microsoft 帐户登录;
- 使用 Microsoft.Owin.Security.Twitter 连接 Twitter 认证, 让用户使用 Twitter 帐户登录;
微软提供了这么多的 OAuth 认证中间件, 对天朝的墙内用户来说, 只能用三个字来概括“然并卵”。
要接入国内腾讯微信、新浪微博提供的 OAuth2 认证, 还是要根据现有的中间件 Microsoft.Owin.Security 进行二次开发, 上面微软提供的 Facebook、 Google 等实现可以作为参考。
先来简单回顾一下 OAuth2 的认证流程, 如下图所示:
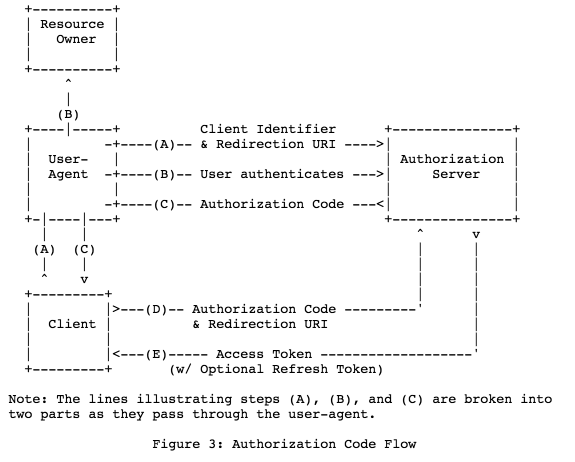
直接和 OAuth2 认证服务器交互的步骤有:
- (A) 将用户代理(浏览器)重定向到认证服务器, 需要提供客户端凭据 (Client Identifier) , 并取得认证码 (Authorization Code) ;
- (D) 使用认证服务器返回的认证码 (Authorization Code) 获取访问凭据 (Access Token) ;
- (E) 根据访问凭据 (Access Token) 获取用户信息。
Microsoft.Owin.Security 对这些步骤提供了优秀的扩展支持, 扩展步骤如下:
1、 创建自定义的 OAuth2AuthenticationOptions ,并继承自 Microsoft.Owin.Security.AuthenticationOptions , 代码如下:
public class OAuth2AuthenticationOptions : AuthenticationOptions {
    // Client App Identifier
    public string AppId { get; set; }
    // Client App Secret
    public string AppSecret { get; set; }
    // The authorize url
    public string AuthorizationEndpoint { get; set; }
    // Token url
    public string TokenEndpoint { get; set; }
    // User info url
    public string UserInformationEndpoint { get; set; }
}
2、 创建一个自定义的 Owin 中间件 OAuth2AuthenticationMiddleware , 并继承自 Microsoft.Owin.Security.AuthenticationMiddleware :
public class GdepAuthenticationMiddleware :
    AuthenticationMiddleware<GdepAuthenticationOptions> {

    protected override AuthenticationHandler<OAuth2AuthenticationOptions> CreateHandler() {
        return new OAuth2AuthenticationHandler(httpClient, logger);
    }

}
重写的基类的 CreateHandler 非常重要, 整个 OAuth2 认证的过程都会在这个方法创建的 AuthenticationHandler 实例中完成。
3、 接下来就是最重要的部分, OAuth2AuthenticationHandler 的实现了, 先来看一下基类 AuthenticationHandler , 实现它需要实现下面的几个方法:
public abstract class AuthenticationHandler {

    protected abstract Task<AuthenticationTicket> AuthenticateCoreAsync ();

    protected virtual Task ApplyResponseChallengeAsync () { }

    public virtual Task<bool> InvokeAsync () { }

}
接下来分别说明一下这几个方法的作用:
在 ApplyResponseChallengeAsync 方法中响应 HTTP 401 Unauthorized , 将用户重定向到认证服务器, 即实现上面的步骤 (A) , 示例代码如下:
var authorizationEndpoint = Options.AuthorizationEndpoint +
    "?response_type=code" +
    "&client_id=" + Uri.EscapeDataString(Options.AppId) +
    "&redirect_uri=" + Uri.EscapeDataString(redirectUri) +
    "&scope=" + Uri.EscapeDataString(scope) +
    "&state=" + Uri.EscapeDataString(state);

var redirectContext = new GdepApplyRedirectContext(Context, Options, properties, authorizationEndpoint);
Options.Provider.ApplyRedirect(redirectContext);
在 AuthenticateCoreAsync 方法中根据认证服务器返回的认证码 (Authorization Code) 来获取用户信息, 示例代码如下:
var requestPrefix = Request.Scheme + "://" + Request.Host;
var redirectUri = requestPrefix + Request.PathBase + Options.CallbackPath;

var tokenRequest = new Dictionary<string, string> {
    ["grant_type"] = "authorization_code",
    ["code"] = code,
    ["redirect_uri"] = redirectUri,
    ["client_id"] = Options.AppId,
    ["client_secret"] = Options.AppSecret
};
var tokenResponse = await httpClient.PostAsync(
    Options.TokenEndpoint,
    new FormUrlEncodedContent(tokenRequest)
);
tokenResponse.EnsureSuccessStatusCode();

string json = await tokenResponse.Content.ReadAsStringAsync();
var form = JObject.Parse(json);

var accessToken = form.Value<string>("access_token");
var expires = form.Value<string>("expires_in");
var tokenType = form.Value<string>("token_type");
var refreshToken = form.Value<string>("refresh_token");

string graphAddress = Options.UserInformationEndpoint + "?access_token=" + Uri.EscapeDataString(accessToken);
if (Options.SendAppSecretProof) {
    graphAddress += "&appsecret_proof=" + GenerateAppSecretProof(accessToken);
}

var graphRequest = new HttpRequestMessage(HttpMethod.Get, graphAddress);
graphRequest.Headers.Authorization = new AuthenticationHeaderValue("Bearer", accessToken);
var graphResponse = await httpClient.SendAsync(graphRequest, Request.CallCancelled);
graphResponse.EnsureSuccessStatusCode();
json = await graphResponse.Content.ReadAsStringAsync();
JObject user = JObject.Parse(json);
在 InvokeReplyPathAsync 方法中用 SignInManager 登录, 然后返回给后续的应用程序 WebAPI 来处理, 示例代码如下:
var context = new GdepReturnEndpointContext(Context, ticker);
context.SignInAsAuthenticationType = Options.SignInAsAuthenticationType;
context.RedirectUri = ticker.Properties.RedirectUri;

await Options.Provider.ReturnEndpoint(context);

if (context.SignInAsAuthenticationType != null && context.Identity != null) {
    var grantIdentity = context.Identity;
    if (!string.Equals(grantIdentity.AuthenticationType, context.SignInAsAuthenticationType, StringComparison.Ordinal)) {
        grantIdentity = new ClaimsIdentity(grantIdentity.Claims, context.SignInAsAuthenticationType, grantIdentity.NameClaimType, grantIdentity.RoleClaimType);
    }
    Context.Authentication.SignIn(context.Properties, grantIdentity);
}
到现在为止, 自定义的 OAuth2 认证中间件基本上就完成了, 代码量不算多, 如果有不清楚的地方, 可以参阅 katanaproject 的源代码。